 ©
©
|
©
|
|
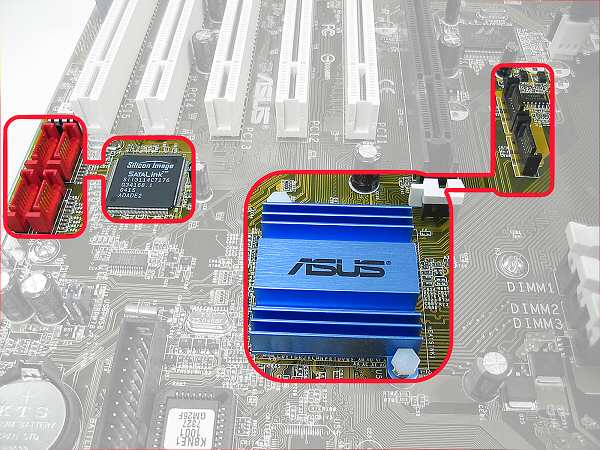
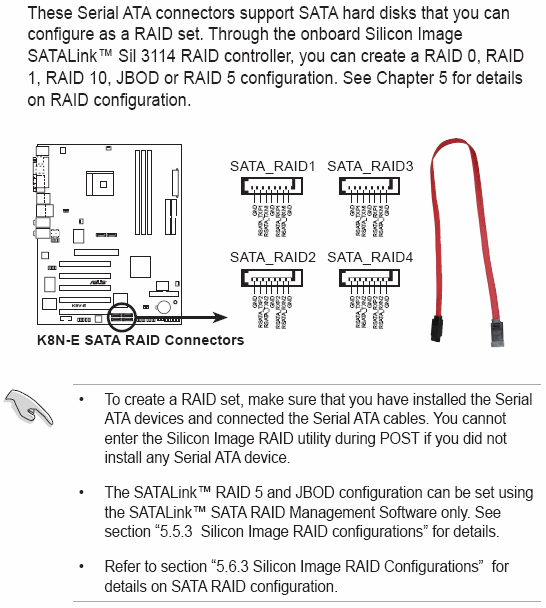
Previous: Data & Power Cables What is Serial ATA? Serial ATA (SATA) is an interface for getting data back & forth between the drives and the disk controller. The classic 40-pin ATA interface is now commonly referred to as PATA, for Parallel ATA. Serial ATA is now the de facto standard for hard drives and rapidly becoming the standard for optical drives. It generally uses the same mechanicals in the drives as the equivalent 40-pin Parallel ATA drive from the same company. In the past, Serial ATA has been the source of a lot of headaches for me when trying to help newbies troubleshoot their new SATA-equipped computers...  The good news is that most of the worst problems are history. Do be careful not to break the SATA connector off your hard drive. The following information may not be necessary for everyone, since SATA has matured, and people have deemed the role-playing part highly obnoxious to read. Well... don't read it, then. ; ) If you want the quick essentials, it boils down to this: make sure your hard drive's SATA cable is plugged into a motherboard jack that is connected right to the motherboard's southbridge (see the manual to determine which ones they are). Begin Windows Setup from your Windows CD or DVD and see if it just works as-is. If Windows Setup has problems seeing your hard drive, or problems on the second stage, then you probably need to supply drivers for its hard-disk controllers yourself (for instance, if the controller is in AHCI mode) or else go into the motherboard's BIOS menu and switch the hard-disk controllers to a mode that doesn't require drivers. Loading drivers During Setup of Windows Vista, watch for the screen shown below and click "Load Driver," then give it your motherboard CD-ROM or another CD or flash drive that contains the driver software for your motherboard's disk controller. 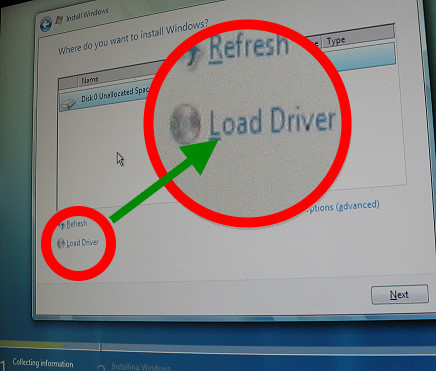 If you're installing Windows XP, then press the F6 key (preceded by the F-lock key if your motherboard has one) and you can provide the necessary drivers on a floppy diskette. Concept break: many motherboards feature two SATA controllers, each with its own jacks. It matters which controller your drive is plugged into, because when you set up Windows, the controller you pick will determine what SATA drivers (if any) you need to provide to Windows Setup on a floppy diskette. READ your motherboard manual, it will have diagrams showing which SATA jacks connect to which SATA controller. It should also tell you where to find the drivers or how to generate driver floppies using a utility from the CD-ROM that came with the motherboard. The photo below shows my Asus K8N-E Deluxe. You'll see this photo again later. 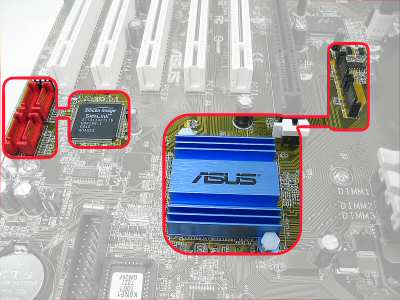 Here's a close-up of some SATA jacks. They're designed asymmetrically so that you plug the cable in correctly. You can see how thin the plastic "blade" in the center is... be careful not to break them. 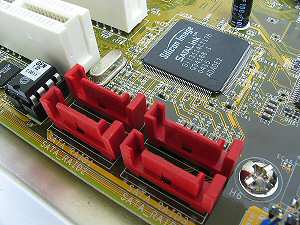 The rear of a Seagate SATA hard drive, lying upside-down for a better photo. The SATA data interface is the narrower connector, and the SATA power interface is the wider one at the right. Again, you see that they're both asymmetrical so that you plug things in right, and you see that they're pretty thin plastic. 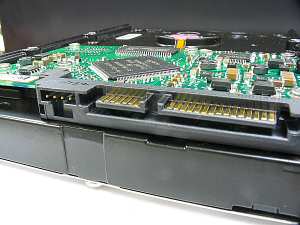 Serial ATA data cable. Both ends are the same. 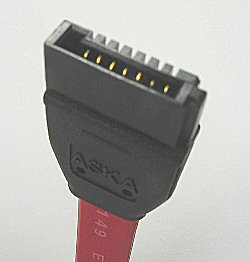 Serial ATA power plug. 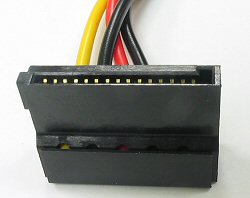 ~5000 posts later... what mechBgon found out newbies need to know about SATA SATA controllers: the hardware aspect Onboard SATA controllers are one of two types, "native" or PCI-based. The information that follows assumes that you want to set up Windows on your SATA drive. "Native" SATA controllers are built into the motherboard's southbridge chip like the "regular" ATA controllers are. They ride on the high-speed link between the southbridge and northbridge. Soldered-down PCI-based SATA controllers are frequently added to motherboards as a bonus feature. Being a PCI-based device, they share the PCI bus with any other PCI-based goodies your motherboard might feature, and with any PCI cards you might add to the system. Basic RAID knowledge for newbies RAID1 is when two or more hard drives mirror eachother in real time, so that if one fails, the computer will be able to limp along on the other one(s), preserving your data from loss. Total capacity of a RAID1 array is equal to the capacity of the smallest drive (two 200GB drives yield a 200GB RAID1 array).
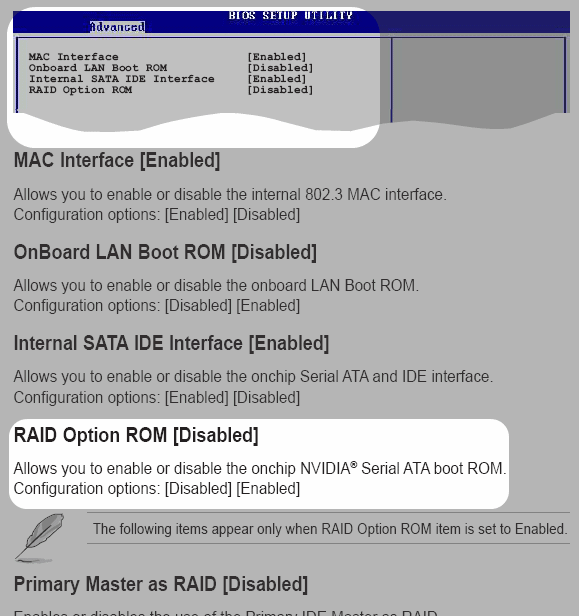
RAID0 is when two or more drives split up the data amongst themselves in real-time so that they can combine their data-transfer speeds for higher overall transfer rates (in theory... see AnandTech's review of RAID0 for a reality check in some common scenarios). With RAID0, if one drive fails, all the data's lost. Total capacity of a RAID0 array is equal to the capacity of the smallest drive multiplied by the number of drives in the array (two 200GB drives yield a 400GB RAID0 array). The benefit of RAID1 is self-evident. The benefits of RAID0...? It depends on what you'll be doing with the computer. As a blanket recommendation, I'd steer you away from the whole RAID thing if you're a first-timer. Driver software, Windows Setup, and you SATA controllers usually have two or three modes of operation: "normal" or RAID, plus AHCI mode on many of today's motherboards. You chose between these modes in the motherboard's BIOS menu, or sometimes with a jumper setting. If you use any of the following:
To re-emphasize this, the same SATA controller will use different drivers depending on which mode you picked. The different versions of the drivers should be included on the motherboard's CD-ROM disc that comes with it. You will usually need an operational computer to get them onto a floppy diskette or a USB flash drive for Windows Setup to use them. Some motherboards come with actual floppies all ready to use, and some motherboards come with a CD-ROM that'll supply them to Windows Setup when they're needed. Another re-emphasis: if your motherboard has two different SATA controllers, it matters which SATA plug you attach your drive's data cable into. Newbies frequently fail to comprehend this. Read your owner's manual and look carefully at the diagrams. Boot-device priority... why does the second stage of Windows Setup refuse to start? Grrrr!!! If you've set up Windows before, you know that it starts from the Windows CD-ROM, makes a certain amount of progress, and then reboots and finishes the job. For both stages of the procedure to work like I've described, your motherboard's boot-device order should have CD-ROM first, and then... ummm... heh. This is the tricky part to making this SATA guide, because there are NO blanket answers to this part. Some motherboards, you would choose the hard drive by name. Some motherboards, you would choose the controller that the hard drive is connected to. Some motherboards, you would choose "SCSI" because that's how its BIOS views third-party disk controllers. Anyway, if your system does not proceed with the second phase of Windows Setup after it's completed the first phase, then you need to change your boot-device priority. Ok newbies, let's practice using mech's Asus K8N-E Deluxe! : ) I know it's sometimes hard to translate all that stuff into reality, even if you've studied it closely. So let's do some role-playing here. Enter my hypothetical first-timer newbies, who will get the Snail avatar . : )
|
 ~ we are typical newbies! : )
 ~ Hi newbies. : ) The photo below is my Asus K8N-E Deluxe. Look, it has two different sets of SATA plugs, one up by the CPU, and then those red ones down by the bottom edge of the board. Does it matter which set I use? and if so, why does it matter? (click the photo to enlarge)