 ©
©
|
©
|
|
Previous: Installing the hard drive Connecting the power & data cables and the case wiring Back to the previous pageFirst I'll hook up the floppy drive (I realize most of you won't have one, but whatever). For better visibility, I'm removing its cage from the case for the photos. The red stripe on the edge of the floppy's data cable is on the left here, because I know that's the Pin-#1 end of the receptacle for this particular floppy drive. Forum member Jojo7 mentioned the significance of the twist in the floppy cable, which you can see just below my left thumb. It's no accident that it's got a twist in it, and the motherboard and floppy drive must be on opposite sides of that twisted section. If your floppy cable has multiple connectors, check this. : )  The floppy's power cable is directional, so don't put it on upside-down. 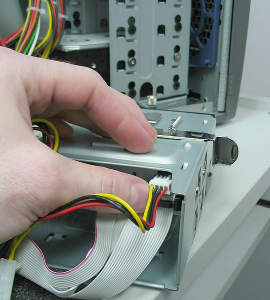 Slide the floppy cage back into place. 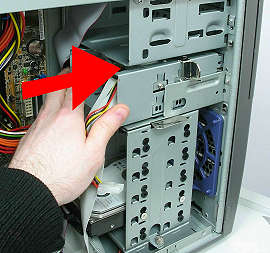 Now I'll give the CD-ROM drive a data cable and a power cable.  Connecting the motherboard and hard drive with a second IDE data cable... 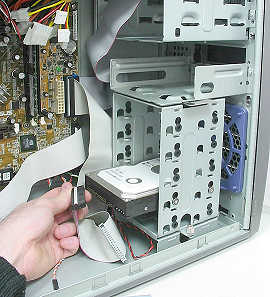 ...and a power cable. 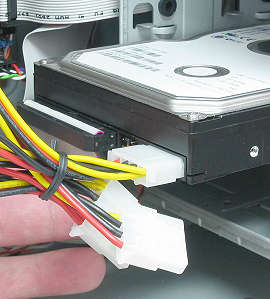 Next, let's get out the motherboard manual, and patiently work through it until we find the diagram showing the pins that we plug the case's buttons and lights into. Here we go:  Each motherboard may have its own unique pinout, and cases will vary too, so I'm going to take a closeup for the general idea and let you match up your plugs to your motherboard. Remember, the motherboard owners' manual is your friend. : ) 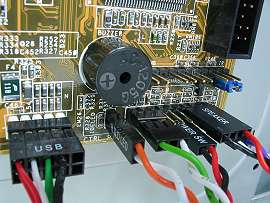 This particular case has a Power LED and three hard-drive-activity LEDs, so you may need to try several HDD LED plugs to find the one that you prefer to have lighting up when the hard drive is doing stuff. Concept break! LEDs are light-emitting diodes, and diodes (by definition) only let power flow in one direction, so if a given LED won't light up when it should, it might just need its plug flipped over (or it might be on the incorrect pins). The wiring and manual may help you identify the + and - wires for the LEDs, but there's no harm in the trial-&-error approach either.This case's USB wiring comes set up for Asus motherboards, which is what I used here. If you aren't positive that your motherboard's pinout is the same as the wiring scheme for the case, it would be better not to try to use the front USB ports until you've gotten an experienced second opinion. There is a way to reorganize the wires in the plug if you have a monoblock plug like I've got here. 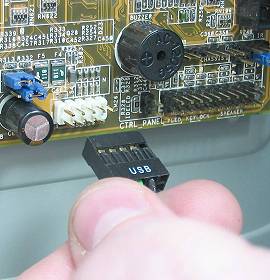 Like many motherboards, this A7N266-VM/AA came with some accessory outlets that can be installed in vacant PCI slots if I want them. From left to right, I've got a pair of extra USB ports, a pair of special S/PDIF digital-audio output jacks, and a second "serial port" here, and I'm taking out three PCI slot covers to accomodate them. 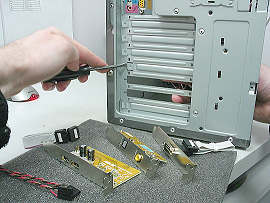 I'm securing these with a coarse-thread screw. Tighten them fairly snugly, then plug their cables into the motherboard as directed by your motherboard manual. 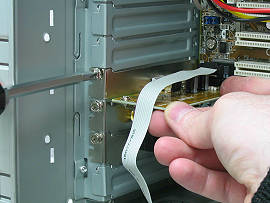 The result. 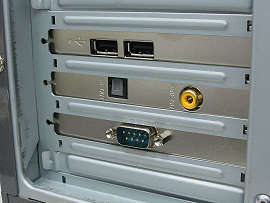 If you're using add-in cards, such as a video card, audio card, TV-tuner card or so forth, install them at this point. Lastly, I'm going to confirm that the rocker switch on the exterior of the power supply is flipped to the 'Off' position, and then plug in the main ATX power cable (and if this motherboard used the ATX12V cable or other additional power cables, I'd plug them in as well). 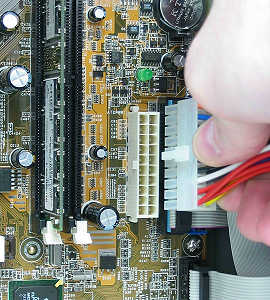 Here's a side view of the computer completely assembled. Confirm that your cables are secured so they won't get caught in a fan. 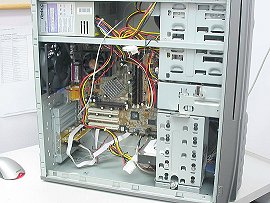 Snack time! : ) Now fire up the system and see if it calls the CPU what it really is. If not, it usually just needs its CPU bus speed adjusted in the BIOS (if so, consult the owner's manual). When the hardware's ready, consult the Security during Windows Setup page and get your preparations made for installing Windows without getting wormed or hacked in the process (assuming you're using Windows). After your preparations are all in place, have your computer boot from your Windows CD and begin Windows Setup. How do I get the computer to boot from my operating-system CD-ROM so I can set up my operating system? With most motherboards, you do this by entering the motherboard's BIOS and manually setting its first boot device to CD-ROM. To enter the BIOS, press the Del key on the keyboard at the first POST screen. Here's an example that shows a motherboard that has a Phoenix BIOS (click the picture to expand it). I've used the arrow keys and the Enter key to manuever to the Advanced page, then used the arrow keys to go down to First Boot Device, pressed the Enter key, and now I can use the arrow keys to select CDROM and press Enter again to finalize that choice. After I'm done, I press the F10 key to do a Save & Exit, and the system will now check the CD-ROM drive to see if there's a bootable CD in it.  On some BIOSes, when you reach the list of boot devices, you must adjust their priority by highlighting the top one in the list and pressing the minus (-) key to lower it in the stack. |