Start
Case prep 1
Case prep 2
Data and power cables
Serial ATA stuff
General motherboard/CPU info
Testing & installing the motherboard assembly
Installing the hard drive
Final connections
Security during Windows Setup
Best practices for ongoing security
Resources (drivers, diagnostics, links, online antivirus scans, antispyware resources)
A brief visual glossary
|
Previous: Data & power cables or Serial ATA stuff
Concept break: what to know about CPUs in general
Retail v. OEM ĀRetail-boxed CPUs come with 3-year warranties backed by the CPU manufacturer, and include a heatsink/fan and thermal-transfer material. OEM CPUs may come with a short warranty from the store, and don't include a heatsink/fan unit or thermal-transfer material.
Asymmetrical pin patterns ĀCPUs only fit into their sockets in one orientation.
Overheat protection ĀAll the AMD and Intel CPUs now feature overheat protection. If your system's turning itself off soon after startup, there may be a heat-transfer problem.
Some heatsinks fit both ways, some do not ĀSocketA heatsinks (AthlonXP, Duron, and SocketA Sempron) are directional. Athlon64, Pentium4, Core-series and all recent Celerons use symmetrical heatsinks so you can't put them on backwards.
Thermal-transfer material ĀThermal-transfer material is needed to bridge the microgap between the surfaces of the CPU and heatsink. Thermal grease and phase-change thermal compounds are the two common types.
Electrostatic shock can harm your CPU ĀBe sure to ground yourself before and during the handling of the CPU and the other parts shown in the next pages.
Memory installation
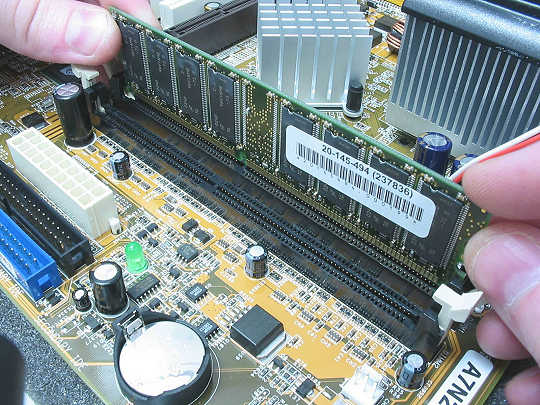
Plugging in the memory module on my build here. Modern systems use dual-channel or even triple-channel memory layouts, where sets of memory modules work together as teams. Check the motherboard's owner's manual to determine which slots to put your modules in for dual-channel or triple-channel operation.
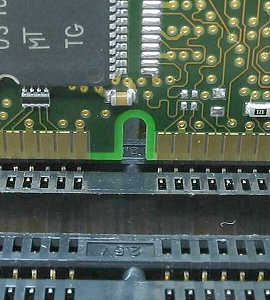
The edge of the module that plugs into the socket has a notch in it. The notch is off-center to prevent the module from being plugged into the slot backwards. Here is a very close-up view of the bars in the memory slots, and a memory module with its corresponding notch.
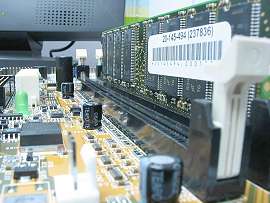
It can take a fair amount of pressure to seat the memory module(s)... push straight down evenly on the top edge of it with your thumbs. Here's an edge-on view showing the memory module fully seated in the slot. You can't see any trace of the gold contacts at the edge of the module now, and the white plastic retaining clips at the end are fully swung up-and-in against the ends of the module.
Specifics on popular motherboard/CPU types
SocketA (AthlonXP, Duron and Socket462 Sempron) click here for full coverage The build featured in my guide.
Socket478 (older Pentium4 and Celeron) click here for full coverage Thanks to Vegetto, I have great photos for the Socket478 folks too. Ā:Ā)
Socket754 and Socket 939 (Athlon64, and Socket754 Semprons) click here.
LGA775 (pinless Intel processors, e.g. Core series) click here
Next: Bench-test & installation of the motherboard/CPU assembly
|
 ®
®